In this article I will explain with an example, how to save image captured using Webcam into database in ASP.Net Core (.Net Core 7) Razor Pages.
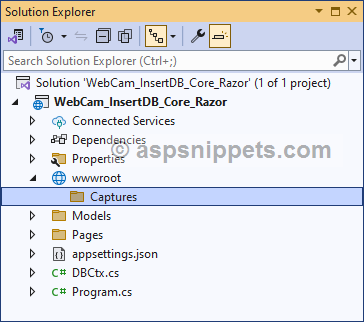
Captures Folder Location
The Captures Folder (Directory) is located inside the wwwroot Folder (Directory).
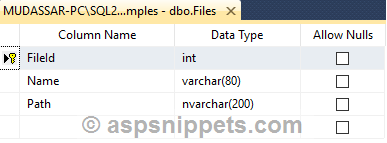
Database
I have made use of the following table Files with the schema as follows.
Note: You can download the database table SQL by clicking the download link below.
Model
The Model class consists of following properties.
public class FileModel
{
[Key]
public int FileId { get; set; }
public string Name { get; set; }
public string Path { get; set; }
}
Database Context
Once the
Entity Framework is configured and connected to the database table, the Database Context will look as shown below.
public class DBCtx : DbContext
{
public DBCtx(DbContextOptions<DBCtx> options) : base(options)
{
}
public DbSet<FileModel> Files { get; set; }
}
Razor PageModel (Code-Behind)
The Razor Page consists of following Handler methods.
Handler method for handling GET operation
This Handler method is left empty as it is not required.
Handler method for handling POST operation for saving the Captured Image
Inside this Handler method, the captured Image is received in BASE64 string format.
Then, the BASE64 string is converted into a BYTE Array and file path is read using IWebHostEnvironment interface and the Byte Array is saved as Image file in the Folder (Directory).
Finally, the file name along with path is saved into the database using
Entity Framework.
[ValidateAntiForgeryToken]
public class IndexModel : PageModel
{
private IWebHostEnvironment Environment;
private DBCtx Context { get; }
public IndexModel(IWebHostEnvironment _environment, DBCtx _context)
{
this.Environment = _environment;
this.Context = _context;
}
public void OnGet()
{
}
public JsonResult OnPostSaveCapture(string data)
{
string fileName = string.Format("{0}.jpg",DateTime.Now.ToString("dd-MM-yy hh-mm-ss"));
//Convert Base64 Encoded string to Byte Array.
byte[] imageBytes = Convert.FromBase64String(data.Split(',')[1]);
//Save the Byte Array as Image File.
string filePath = Path.Combine(this.Environment.WebRootPath, string.Format("Captures/{0}", fileName));
System.IO.File.WriteAllBytes(filePath, imageBytes);
// Insert Image Name and Path in Database.
this.Context.Files.Add(new FileModel
{
Name = Path.GetFileName(fileName),
Path = string.Format("~/Captures/{0}", fileName)
});
this.Context.SaveChanges();
return new JsonResult("true");
}
}
Razor Page (HTML)
HTML Markup
The View consists of following elements:
div – For displaying Live Web Camera.
img – For displaying the captured image.
buttons – One For capturing the picture using the Web Camera and another one for uploading in the Folder (Directory) and the image path in database.
Inside the View, the following JS files are inherited.
1. jquery.min.js
2. webcam.js
Applying the jQuery Webcam.js plugin
Inside the
jQuery document ready event handler, the
jQuery Webcam.js plugin is applied to the HTML DIV.
The following are the configuration properties of the
jQuery Webcam.js plugin:
width – Width of the DIV that displays the live camera.
height – Height of the DIV that displays the live camera.
image_format – The file format of the Image i.e. JPEG, PNG, etc.
jpeg_quality – The quality of the captured Image.
Capturing the Image from Web Camera (Webcam)
When the
Capture Button is clicked, the Image is captured from Web Camera (Webcam) using the
snap function of the
jQuery Webcam.js plugin.
Then, the captured Image data in BASE64 string format is assigned to the HTML Image element.
Uploading the Image from Web Camera (Webcam)
When the
Upload Button is clicked, the captured Image data in BASE64 string format is uploaded to Server using
jQuery AJAX call and then inside the handler method, it is converted into Image file and saved in Folder (Directory).
Finally, the image name along with path is saved in database and success message is displayed using
JavaScript Alert Message Box.
@page
@model WebCam_InsertDB_Core_Razor.Pages.IndexModel
@{
Layout = null;
}
<!DOCTYPE html>
<html>
<head>
<meta name="viewport" content="width=device-width" />
<title>Index</title>
<script type="text/javascript" src="https://cdnjs.cloudflare.com/ajax/libs/jquery/3.7.1/jquery.min.js"></script>
<script type="text/javascript" src="https://cdnjs.cloudflare.com/ajax/libs/webcamjs/1.0.26/webcam.js"></script>
<script type="text/javascript">
$(function () {
Webcam.set({
width: 320,
height: 240,
image_format: 'jpeg',
jpeg_quality: 90
});
Webcam.attach('#webcam');
$("#btnCapture").click(function () {
Webcam.snap(function (data_uri) {
$("#imgCapture")[0].src = data_uri;
$("#btnUpload").removeAttr("disabled");
});
});
$("#btnUpload").click(function () {
var obj = {};
obj.data = $("#imgCapture")[0].src;
var token = $('input:hidden[name="__RequestVerificationToken"]').val();
$.ajax({
type: "POST",
url: "/Index?handler=SaveCapture",
beforeSend:function (xhr) {
xhr.setRequestHeader("XSRF-TOKEN", token);
},
data: obj,
success: function (r) {
if (r) {
$("#imgCapture")[0].src = "";
alert("Image uploaded successfully.");
}
}
});
});
});
</script>
</head>
<body>
@Html.AntiForgeryToken()
<table border="0" cellpadding="0" cellspacing="0">
<tr>
<th align="center"><u>Live Camera</u></th>
<th align="center"><u>Captured Picture</u></th>
</tr>
<tr>
<td><div id="webcam"></div></td>
<td><img id=" imgCapture" /></td>
</tr>
<tr>
<td align="center">
<input type="button" id="btnCapture" value="Capture" />
</td>
<td align="center">
<input type="button" id="btnUpload" value="Upload" disabled="disabled" />
</td>
</tr>
</table>
</body>
</html>
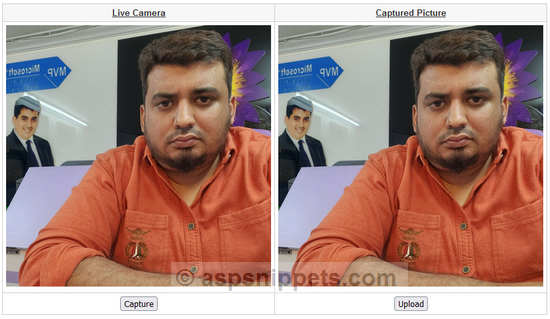
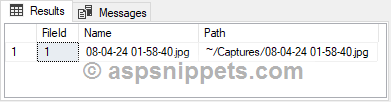
Screenshots
The Form
Inserted Record in Database
Browser Compatibility
* All browser logos displayed above are property of their respective owners.
Downloads