Software Information
What is @rendermode InteractiveServer?
It simply makes that UI Interactive in other words it enables the real-time connection between the browser and the server.
How it works?
When it is applied, Blazor establishes a
SignalR circuit between i.e. a persistent WebSocket connection between Server and Browser (Client).
1. When a user clicks a button (@onclick), the browser sends that event over the
SignalR connection to the server.
2. The server runs the C# code inside the Event handler.
3. The server calculates exactly what changed and sends those changes back to the Browser (Client).
4. The browser updates the display instantly to reflect the changes.
Why it is needed?
By default,
.Net Core 10 uses static
Server-Side Rendering (SSR), where interactive events such as
OnClick won’t work as there is not established connection between the Browser (Client) and the Server.
Even if someone clicks on the Button, nothing will happen or some exception will be raised.
Where it can be set?
It can be set in two different locations:
1. Specific Page (Locally)
@page "/"
@rendermode InteractiveServer
Note: This setting will be applied to specific Page where it is used.
2. App.Razor (Globally)
You will need to add @rendermode="InteractiveServer" in the Routes node in the App.razor.
Note: This setting will be applied to all Pages.
<Routes @rendermode="InteractiveServer" />
Then add the following code
@code {
[CascadingParameter]
private HttpContext HttpContext {get;set; } = default!;
private IComponentRenderMode? RenderModeForPage =>
HttpContext.GetEndpoint()?.Metadata.GetMetadata<RenderModeAttribute>()?
.Mode;
}
Complete App.razor will now look as follows:
<!DOCTYPE html>
<html lang="en">
<head>
<meta charset="utf-8" />
<meta name="viewport" content="width=device-width, initial-scale=1.0" />
<base href="/" />
<ResourcePreloader />
<link rel="stylesheet" href="@Assets["app.css"]" />
<link rel="stylesheet" href="@Assets["Button_Click_Blazor.styles.css"]" />
<ImportMap />
<HeadOutlet />
</head>
<body>
<Routes @rendermode="InteractiveServer" />
<ReconnectModal />
<script src="@Assets["_framework/blazor.web.js"]"></script>
</body>
</html>
@code {
[CascadingParameter]
private HttpContext HttpContext {get;set; } = default!;
private IComponentRenderMode? RenderModeForPage =>
HttpContext.GetEndpoint()?.Metadata.GetMetadata<RenderModeAttribute>()?
.Mode;
}
You will need to make sure that you call the AddInteractiveServerRenderMode method in the Program.cs file.
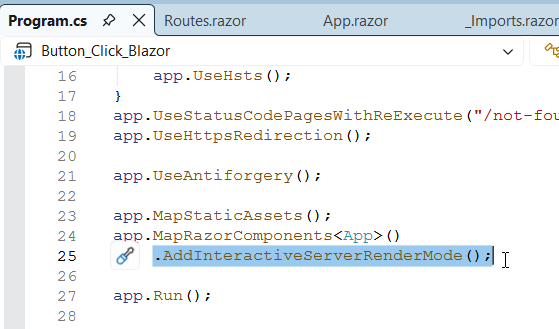
Screenshot

Testing Log
Compiled in: Visual Studio 2026
Framework: .Net Core 10.
Result: 100% Success
Downloads